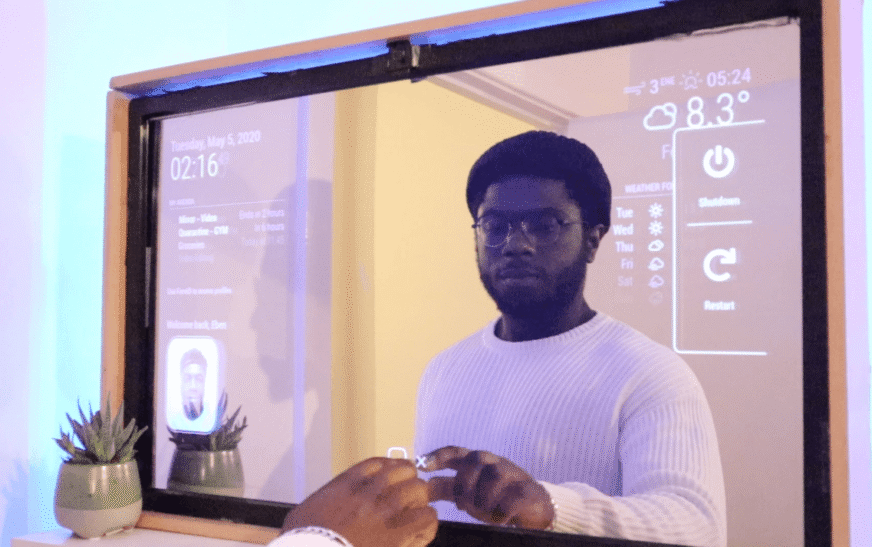
Imagine waking up every morning to a sleek mirror that doesn’t just reflect your face—but also shows the weather, your calendar, news headlines, and even your step count. That’s exactly what I did when I built a smart mirror using a Raspberry Pi. It started as a weekend curiosity, but quickly turned into a fully functional, voice-responsive home assistant that now sits proudly in my hallway.
This project combines DIY electronics, open-source software, and a bit of creativity to transform an ordinary mirror into an intelligent display. Whether you’re a tech enthusiast, a home automation fan, or just someone who loves cool gadgets, building a smart mirror with a Raspberry Pi is one of the most rewarding projects you can tackle. In this guide, I’ll walk you through every step—from sourcing parts to coding the interface—so you can build your own.
Why Build a Smart Mirror with a Raspberry Pi?
The Raspberry Pi is the perfect brain for a smart mirror. It’s affordable, energy-efficient, and powerful enough to run a lightweight web-based interface. Unlike commercial smart mirrors that cost hundreds or even thousands of dollars, a DIY version using a Raspberry Pi can be built for under $150—and you get full control over the features and design.
Here’s what makes the Raspberry Pi ideal for this project:
- Low power consumption – Runs quietly and doesn’t overheat.
- GPIO pins – Allow integration with sensors, LEDs, or motion detectors.
- Wi-Fi and Bluetooth – Enables real-time data fetching and voice control.
- Community support – Thousands of tutorials and forums to help troubleshoot.
Plus, once you’ve built it, you can customize everything—from the layout of the dashboard to the voice assistant you use. It’s not just a mirror; it’s a personal command center.
What You’ll Need: Parts and Tools
Before diving into the build, let’s gather all the components. Most of these are easily available online or at local electronics stores.
Essential Hardware
- Raspberry Pi 4 (2GB or 4GB model) – The 4GB version gives more headroom for multitasking.
- MicroSD card (32GB, Class 10) – For the operating system and software.
- Two-way mirror glass or acrylic sheet – This is the magic ingredient. It reflects light like a mirror but allows light from behind to shine through.
- Monitor (19–24 inches recommended) – An old LCD screen works perfectly. HDMI input is a must.
- Monitor bezel or frame – To hold the screen and mirror in place.
- Power supply (5V, 3A) – Official Raspberry Pi power adapter is best.
- HDMI cable – To connect the Pi to the monitor.
- USB microphone (optional) – For voice commands.
- PIR motion sensor (optional) – To wake the mirror when someone approaches.
Tools You’ll Need
- Screwdrivers (Phillips and flathead)
- Hot glue gun or strong adhesive
- Measuring tape and ruler
- Drill (if customizing a frame)
- Wire strippers (if adding sensors)
Pro tip: Look for a monitor with thin bezels—it makes the final build look more seamless. I used a 22-inch Dell monitor I found secondhand for $40.
Step-by-Step: Assembling the Smart Mirror
Now that we have everything, let’s start building. The process has three main phases: preparing the display, installing the software, and assembling the hardware.
1. Prepare the Display and Mirror
Start by removing the monitor’s plastic casing to expose the LCD panel. Be gentle—LCDs are fragile. Once the screen is free, clean it thoroughly.
Next, cut the two-way mirror to fit the screen size. You can order custom-cut mirror acrylic online, or visit a local glass shop. I used 3mm acrylic because it’s lighter and safer than glass.
Place the mirror over the screen and secure it with a frame or bezel. I built a simple wooden frame using scrap wood and painted it black for a modern look. Use hot glue or double-sided tape to hold the mirror in place—just avoid blocking the screen edges.
2. Set Up the Raspberry Pi
Download the latest version of Raspberry Pi OS Lite (headless version, since we won’t need a desktop). Flash it to the MicroSD card using Raspberry Pi Imager or BalenaEtcher.
Before inserting the SD card, enable SSH and Wi-Fi by creating two empty files on the boot partition:
- Create a file named
ssh(no extension) - Create a file named
wpa_supplicant.confwith your Wi-Fi details
Insert the SD card, connect the Pi to the monitor via HDMI, and power it on. Once booted, SSH into it using a terminal or PuTTY (default username: pi, password: raspberry).
3. Install the Magic Mirror Software
The most popular software for smart mirrors is MagicMirror², an open-source project by Michael Teeuw. It’s modular, customizable, and perfect for beginners.
To install it, run these commands in the terminal:
sudo apt update && sudo apt upgrade -y
curl -sL https://deb.nodesource.com/setup_16.x | sudo -E bash -
sudo apt install -y nodejs git
git clone https://github.com/MichMich/MagicMirror
cd MagicMirror
npm install
Once installed, start the mirror with:
npm run start
You should see a black screen with a clock and date. Open a browser on another device and go to http://[your-pi-ip]:8080 to view the interface remotely.
4. Customize the Modules
MagicMirror² uses modules to display information. The default setup includes a clock, calendar, and weather. But you can add more—like news feeds, traffic updates, or even a Spotify widget.
Edit the config file:
nano ~/MagicMirror/config/config.js
Here’s a sample configuration I used:
modules: [
  {
    module: "clock",
    position: "top_left"
  },
  {
    module: "weather",
    position: "top_right",
    config: {
      location: "New York",
      apiKey: "your-openweathermap-key"
    }
  },
  {
    module: "newsfeed",
    position: "bottom_bar",
    config: {
      feeds: [
        {
          title: "BBC News",
          url: "http://feeds.bbci.co.uk/news/rss.xml"
        }
      ]
    }
  }
]
Save and restart the mirror. You’ll see the new layout instantly.
Adding Voice Control and Motion Sensing
To make your smart mirror truly “smart,” add voice commands and motion detection.
Voice Control with Google Assistant or Mycroft
I integrated Google Assistant using the Google Assistant SDK. Here’s how:
- Create a project on the Google Actions Console
- Enable the Google Assistant API
- Install the SDK on the Pi:
python3 -m pip install --upgrade google-assistant-sdk[samples]
Authenticate your device and test voice commands like “What’s the weather?” or “Set a reminder.”
Alternatively, use Mycroft AI, an open-source voice assistant that respects privacy. It’s easier to self-host and fully customizable.
Motion Sensor for Auto-Wake
To save power and make the mirror feel responsive, I added a PIR motion sensor. When no one is around, the screen turns off. When motion is detected, it wakes up.
Connect the PIR sensor to the Pi’s GPIO pins:
- VCC → 5V
- GND → Ground
- OUT → GPIO 4
Then use a simple Python script to monitor motion and control the display:
import RPi.GPIO as GPIO
import os
import time

GPIO.setmode(GPIO.BCM)
GPIO.setup(4, GPIO.IN)

while True:
    if GPIO.input(4):
        os.system("vcgencmd display_power 1")  # Turn on
    else:
        os.system("vcgencmd display_power 0")  # Turn off
    time.sleep(5)
Run this script at startup using cron or systemd.
Mounting and Final Touches
Once everything is working, it’s time to mount the mirror. I built a shallow wooden enclosure to house the Pi, monitor, and wiring. The back has ventilation holes and a power outlet.
Mount the entire unit on the wall using heavy-duty brackets. Make sure the power cable is accessible. I used a right-angle USB-C cable to keep things tidy.
For a cleaner look, I added LED strip lights around the edge of the mirror. They turn on with the screen and give a futuristic glow. Controlled via GPIO, they sync with the mirror’s wake/sleep cycle.
Key Takeaways
- Building a smart mirror with a Raspberry Pi is affordable and fun—costs under $150.
- MagicMirror² is the go-to software—modular, easy to install, and highly customizable.
- Two-way mirror acrylic is essential—creates the illusion of a floating display.
- Add voice and motion for a premium experience—Google Assistant or Mycroft + PIR sensor.
- Use an old monitor to save money—repurpose tech you already own.
FAQ
Can I use a Raspberry Pi 3 instead of a Pi 4?
Yes, but the Pi 4 is recommended for smoother performance, especially with multiple modules and voice processing. The Pi 3 may lag with heavy usage.
Do I need programming skills to build this?
Basic command-line knowledge helps, but the MagicMirror² setup is beginner-friendly. Most steps involve copying commands and editing config files—no advanced coding required.
Will the mirror work without Wi-Fi?
The core display (clock, date) will work offline, but features like weather, news, and voice control require an internet connection. Consider a mobile hotspot for backup.
Final Thoughts
Building a smart mirror using a Raspberry Pi was one of the most satisfying tech projects I’ve ever done. It’s not just a gadget—it’s a conversation starter, a productivity tool, and a testament to what you can achieve with a little curiosity and a $35 computer.
Whether you’re displaying your daily agenda, checking the weather, or controlling smart lights with your voice, this mirror does it all—with style. And the best part? You built it yourself.
So grab a Raspberry Pi, a mirror, and a monitor. Your smart home just got a whole lot smarter.