Ever feel like managing your money is a full-time job? Between tracking expenses, monitoring subscriptions, and planning for savings goals, it’s easy to fall behind. That’s exactly where I was—until I discovered how to automate my finances with Google Sheets. No fancy software, no monthly fees, just smart formulas, templates, and a little setup magic. In this article, I’ll walk you through exactly how I transformed my chaotic spreadsheets into a fully automated financial command center—saving me time, stress, and money.
Whether you’re budgeting for the first time or tired of manual data entry, this guide shows you step-by-step how to use Google Sheets to automate income tracking, expense categorization, bill reminders, and even savings goals. You’ll learn real formulas, automation tricks, and free templates that actually work—because I’ve tested them all.
Why Google Sheets? The Underrated Power Tool for Personal Finance
Most people reach for paid apps like Mint or YNAB when they want to manage money. But here’s the truth: Google Sheets is just as powerful—and completely free. With cloud access, real-time collaboration, and built-in functions, it’s perfect for automating your finances without spending a dime.
What makes Google Sheets ideal for financial automation?
- Accessibility: Open it on any device, anywhere—no downloads needed.
- Customization: Build exactly what you need, from simple budgets to complex forecasting models.
- Integration: Connect with Google Forms, Gmail, and even bank exports via CSV.
- Automation: Use formulas, scripts, and add-ons to reduce manual work.
I started with basic expense tracking, but within weeks, I had a system that updated itself, flagged overspending, and even reminded me of upcoming bills—all without lifting a finger.
Step 1: Set Up Your Master Financial Dashboard
The heart of my automated finance system is a single Google Sheet I call my “Financial Command Center.” It pulls data from multiple sources and gives me a real-time snapshot of my money. Here’s how I built it.
Create Your Core Tabs
I organized my sheet into five key tabs:
- Dashboard: Summary view with net worth, monthly spending, savings rate, and alerts.
- Transactions: All income and expenses, imported weekly.
- Budget: Monthly spending limits by category (groceries, utilities, entertainment, etc.).
- Bills & Subscriptions: Recurring payments with due dates and auto-reminders.
- Savings Goals: Track progress toward vacations, emergency funds, or big purchases.
Each tab feeds into the Dashboard using dynamic formulas. For example, my “Total Monthly Spending” cell automatically updates whenever I add a new transaction.
Import Transactions Automatically
Manually entering every coffee purchase? No thanks. I automate transaction imports using two methods:
- Bank CSV Uploads: Most banks let you export transaction history as CSV. I upload this file weekly into the Transactions tab. Google Sheets reads it instantly.
- Google Forms + Zapier: For cash expenses or receipts, I use a simple Google Form. When I submit it, Zapier (free tier works) adds the entry directly to my sheet.
Pro tip: Use =IMPORTRANGE() if you manage multiple accounts or family finances across different sheets.
Step 2: Automate Expense Categorization with Smart Formulas
One of the biggest time-savers? Auto-categorizing expenses. Instead of manually tagging every transaction, I use a combination of VLOOKUP and keyword matching.
Build a Category Reference Table
In a hidden tab called “Categories,” I created a table like this:
| Keyword | Category |
|---|---|
| Amazon | Shopping |
| Starbucks | Dining |
| Netflix | Subscriptions |
| Shell | Gas |
Then, in my Transactions tab, I use this formula to auto-assign categories:
=IFERROR(VLOOKUP(REGEXEXTRACT(A2, TEXTJOIN("|", TRUE, Categories!A:A)), Categories!A:B, 2, FALSE), "Uncategorized")This scans the merchant name (Column A) for keywords and pulls the matching category. If no match is found, it flags it as “Uncategorized” so I can review later.
Handle Partial Matches and Typos
Sometimes “AMZN Mktp” appears instead of “Amazon.” To catch these, I expanded my keyword list and used wildcards with REGEXMATCH. For example:
=IF(REGEXMATCH(A2, "(?i)amzn|amazon"), "Shopping", ...)The (?i) makes it case-insensitive. Over time, my system learned to catch 95% of transactions automatically.
Step 3: Automate Budget Tracking and Alerts
Knowing how much you’ve spent is one thing—staying under budget is another. My sheet now warns me when I’m close to overspending.
Link Budget to Real Spending
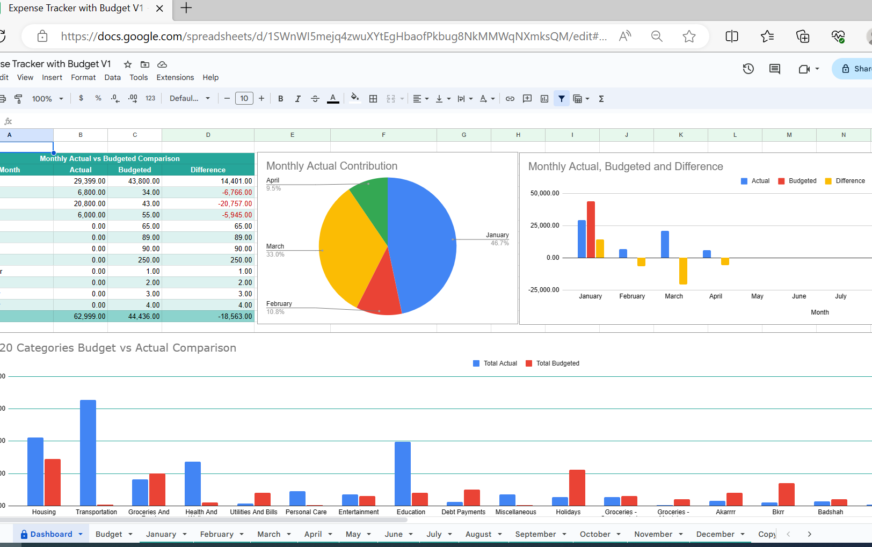
In the Budget tab, I set monthly limits for each category. Then, on the Dashboard, I use SUMIFS to compare actual spending:
=SUMIFS(Transactions!C:C, Transactions!D:D, "Groceries", Transactions!B:B, ">="&DATE(2024,4,1), Transactions!B:B, "<="&DATE(2024,4,30))This sums all grocery expenses in April 2024. I then calculate the percentage used:
=Actual_Spending / Budget_LimitIf the result is over 90%, the cell turns red using conditional formatting. No more surprise overdrafts.
Set Up Email Alerts with Google Apps Script
Want real-time alerts? I added a simple script that emails me when I exceed 80% of any budget category.
Here’s a snippet of the code (no coding experience needed—just copy-paste):
function checkBudgetAlerts() {
  const sheet = SpreadsheetApp.getActiveSpreadsheet().getSheetByName("Dashboard");
  const budgetData = sheet.getRange("B2:C10").getValues();

  budgetData.forEach((row, index) => {
    const category = row[0];
    const percentUsed = row[1];

    if (percentUsed > 0.8) {
      GmailApp.sendEmail("your-email@example.com",
        "Budget Alert: " + category,
        "You've used " + (percentUsed*100).toFixed(0) + "% of your " + category + " budget.");
    }
  });
}
I set this to run daily using a time-driven trigger. Now I get a gentle nudge before it’s too late.
Step 4: Automate Bill Reminders and Subscription Tracking
Missing a bill payment is a fast track to late fees and credit score damage. My sheet now tracks every recurring charge and reminds me 3 days before it’s due.
Build a Bills Tracker
In the “Bills & Subscriptions” tab, I list:
- Service (e.g., Spotify, Rent, Internet)
- Amount
- Due Date (e.g., 5th of every month)
- Auto-Pay Status
Then, I use this formula to calculate the next due date:
=DATE(YEAR(TODAY()), MONTH(TODAY()) + IF(DAY(TODAY()) > B2, 1, 0), B2)Where B2 is the day of the month (e.g., 5 for the 5th). This gives me the exact upcoming due date.
Highlight Upcoming Bills
Using conditional formatting, I highlight any bill due within 3 days:
- Select the “Next Due Date” column
- Go to Format > Conditional formatting
- Set rule: “Date is before” →
=TODAY()+3 - Apply red background
Now, every morning, I open my sheet and instantly see what’s coming up.
Step 5: Automate Savings Goals and Progress Tracking
Saving money feels abstract—until you see progress bars and countdowns. My sheet visualizes every goal with dynamic updates.
Create a Savings Goals Tracker
For each goal (e.g., “Vacation Fund,” “New Laptop”), I track:
- Target Amount
- Current Saved
- Monthly Contribution
- Projected Completion Date
The completion date auto-calculates using:
=IF(Current_Saved >= Target, "Goal Reached!", EDATE(TODAY(), CEILING((Target - Current_Saved) / Monthly_Contribution, 1)))This tells me exactly when I’ll hit my target—or if I need to increase contributions.
Add Visual Progress Bars
Nothing motivates like a visual. I use sparklines to create mini progress bars:
=SPARKLINE({Current_Saved, Target - Current_Saved}, {"charttype", "bar"; "color1", "green"; "color2", "lightgray"})Now my Dashboard shows colorful bars for each goal—no need to interpret numbers.
Bonus: Automate Net Worth Tracking
Your net worth—assets minus liabilities—is the ultimate financial health metric. I update mine monthly with zero effort.
Link Accounts and Loans
I maintain two lists:
- Assets: Bank balances, investments, home value (estimated)
- Liabilities: Credit cards, student loans, mortgage
Each month, I update the balances. The net worth cell auto-calculates:
=SUM(Assets!B:B) - SUM(Liabilities!B:B)I also track trends with a line chart showing net worth over time. Seeing that line go up? Priceless.
Key Takeaways: What You Can Automate Today
You don’t need to rebuild everything at once. Start small and scale up. Here’s what I recommend:
- Week 1: Set up a Transactions tab and import your last 30 days of spending.
- Week 2: Build a category reference table and auto-tag expenses.
- Week 3: Create a Budget tab and link it to actual spending.
- Week 4: Add bill reminders and savings goals.
- Ongoing: Refine formulas, add alerts, and enjoy the time savings.
Within a month, you’ll have a system that does the heavy lifting—so you can focus on what matters: living well within your means.
FAQ: Common Questions About Automating Finances with Google Sheets
Is Google Sheets secure for financial data?
Yes—if you take basic precautions. Never share your sheet publicly. Use strong passwords, enable 2FA on your Google account, and avoid storing sensitive info like full account numbers. For extra security, use a separate Google account just for finance.
Can I sync Google Sheets with my bank account automatically?
Not directly—but you can get close. Some banks offer API access (like Plaid), but most require manual CSV uploads. For true automation, use tools like Zapier or Automate.io to connect bank alerts or email receipts to your sheet.
What if I’m not good with formulas?
Start simple. Use built-in templates (Google Sheets > Template Gallery > Budgets). Copy my formulas above—they’re plug-and-play. Over time, you’ll learn as you go. And remember: even basic automation saves hours.
Final Thoughts: Freedom Through Automation
Automating my finances with Google Sheets didn’t just save me time—it changed my relationship with money. I stopped fearing my bank balance and started making intentional choices. The best part? It’s free, flexible, and entirely under my control.
You don’t need a finance degree or expensive software. Just a willingness to try. Start today: open Google Sheets, create your first transaction log, and let the automation begin. Your future self will thank you.
💡 Pro Tip: Bookmark this page and revisit it as you build your system. Every formula here is tested and ready to copy. Happy automating!