Ever stare at thousands of unorganized photos and wonder, “Where do I even start?” You’re not alone. As a photographer who’s shot over 50,000 images in the past five years, I’ve been there—lost in folders, drowning in duplicates, and wasting precious editing time just finding the right shot. That’s why I developed a streamlined Lightroom workflow that keeps my photo library clean, searchable, and ready for editing in seconds. In this guide, I’ll walk you through exactly how I organize my photos using Adobe Lightroom, step by step—no fluff, just real-world tactics that actually work.
Whether you’re a weekend shooter or a full-time pro, a solid Lightroom photo organization system saves hours, reduces stress, and helps you focus on what matters: creating great images. This isn’t about fancy presets or over-the-top editing tricks. It’s about structure, consistency, and smart habits that scale with your growing library. By the end of this article, you’ll have a repeatable system you can use every time you import a new memory card.
Why Lightroom Is the Best Tool for Photo Organization
Adobe Lightroom isn’t just for editing—it’s a powerhouse for photo management. Unlike basic file explorers or cloud storage apps, Lightroom gives you a centralized hub where you can import, tag, rate, filter, and edit all in one place. Its non-destructive editing means your originals stay safe, and its catalog system keeps everything searchable without cluttering your hard drive.
Here’s what makes Lightroom ideal for organizing photos:
- Smart Previews: Edit offline without touching original files.
- Metadata & Keywords: Tag photos with location, people, events, and gear used.
- Collections & Smart Collections: Group photos by project, trip, or theme—automatically.
- Star Ratings & Color Labels: Quick visual sorting for culling and prioritizing.
- Backup Integration: Sync with cloud storage and external drives seamlessly.
Most photographers underestimate Lightroom’s organizational power. They treat it like a glorified filter app. But once you master its workflow, you’ll wonder how you ever managed without it.
Step 1: Set Up Your Lightroom Catalog the Right Way
Before importing a single photo, you need a solid foundation: your Lightroom catalog. Think of it as the brain of your photo system. A poorly set up catalog leads to chaos. A well-structured one keeps everything running smoothly.
Choose the Right Catalog Location
Store your catalog on a fast internal SSD—not an external drive or cloud folder. Why? Speed and reliability. Lightroom constantly reads and writes to the catalog, and slow drives cause lag and crashes. I keep mine on my Mac’s internal drive and back it up daily to an external SSD and Backblaze.
Name It Meaningfully
Don’t just call it “Lightroom Catalog.” Use something like “Photo_Library_2024.lrcat” so you know exactly what it contains. If you manage multiple projects (e.g., weddings, travel, stock), consider separate catalogs to avoid bloat.
Enable Smart Previews
Go to Catalog Settings > File Handling and check “Build Smart Previews.” This lets you edit photos even when your memory card or external drive isn’t connected. Huge time-saver during travel or client reviews.
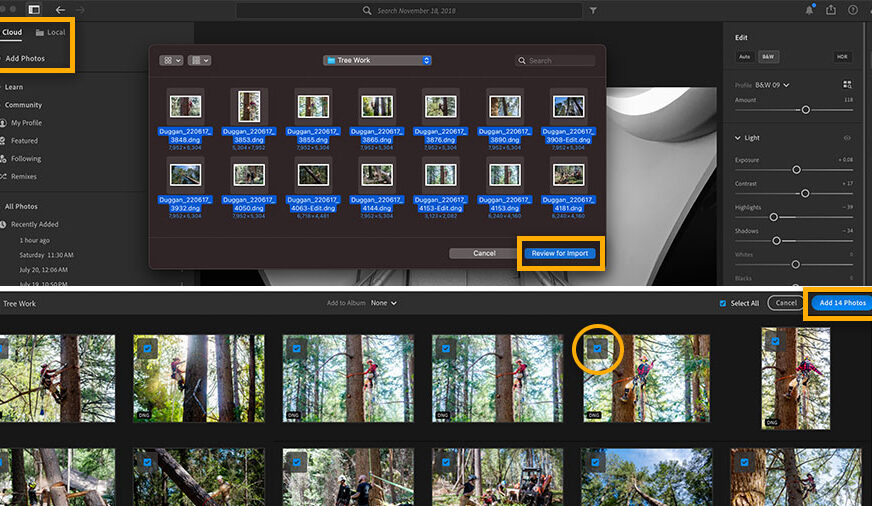
Step 2: Import Photos Like a Pro
The import process is where most photographers go wrong. They dump everything into one folder, skip metadata, and forget to back up. Don’t be that person. Follow this import workflow every time.
Use the “Copy as DNG” or “Copy” Option
I always choose “Copy as DNG” for RAW files. DNG (Digital Negative) is Adobe’s open, future-proof format. It embeds metadata, reduces file corruption risk, and works across devices. If you’re short on space, use “Copy” instead—but never “Move,” which deletes originals from your card.
Organize by Date and Event
During import, use the Destination panel to auto-sort photos into folders like:
/Photos/2024/04_April/2024-04-15_Tokyo_Trip
This structure keeps things chronological and event-based. Lightroom can auto-create these folders using date presets—set it once and forget it.
Add Metadata on Import
Fill in the Metadata Preset field during import. Include your name, copyright, contact info, and default keywords like “Photography,” “Travel,” or “Portrait.” This saves hours later when searching or licensing images.
Enable Backup on Import
Check “Backup to” and select an external drive or cloud folder. I back up to a portable SSD and Google Drive. This gives me two copies the moment photos hit my system—critical for peace of mind.
Step 3: Cull Ruthlessly with Speed and Precision
Editing 1,000 photos takes forever. But if you cull down to 100 strong shots first? That’s manageable. Culling is the secret sauce of an efficient Lightroom workflow.
Use the Library Module for Fast Review
Switch to Library > Grid View and zoom to “Fit” or “Fill.” Use the arrow keys to flip through images quickly. Press P to flag as Pick, X to reject, and U to unflag.
Apply Star Ratings and Color Labels
After initial flagging, go back and rate your top picks with 3–5 stars. Use color labels for context:
– Red: Client selects
– Yellow: Needs retouching
– Green: Social media ready
This visual system helps prioritize editing and delivery.
Filter Smartly with Attributes
Use the Filter Bar (press ) to sort by:
– Flag status (Picks vs. Rejects)
– Star rating
– Color label
– Camera or lens used
This lets you isolate weak shots or group similar images for batch editing.
Step 4: Tag, Keyword, and Make Your Photos Searchable
A photo without keywords is a ghost—impossible to find later. I spend 10–15 minutes after each shoot adding metadata. It pays off tenfold when searching months later.
Use Hierarchical Keywords
Lightroom supports nested keywords. I use a structure like:
Location > Asia > Japan > Tokyo > Shibuya
People > Family > Sarah > Wedding
This lets me search “Tokyo” and see all related shots—even if I only tagged “Shibuya.”
Add People, Events, and Gear
Tag faces with names (Lightroom’s facial recognition helps). Add event keywords like “Wedding,” “Birthday,” or “Product Launch.” Include camera and lens info—super useful for gear reviews or troubleshooting.
Use Metadata Presets for Recurring Shoots
Create presets for common scenarios. For example, a “Wedding Preset” might include keywords: “Wedding,” “Ceremony,” “Reception,” “Bride,” “Groom,” and your studio name. Apply it in one click during import or later in the Library module.
Step 5: Organize with Collections and Smart Collections
Folders are good. Collections are better. Collections are virtual groups—like playlists for your photos—that don’t move files on your hard drive. They’re flexible, reusable, and perfect for organizing by theme.
Create Manual Collections for Projects
I make a new collection for every major shoot:
– “2024 Bali Adventure”
– “Client: Johnson Wedding”
– “Stock Photos – Nature”
Drag and drop photos into them after culling. Easy to share or export later.
Use Smart Collections for Automation
Smart Collections auto-populate based on rules. I have one called “5-Star Favorites” that shows all photos rated 5 stars. Another: “Unedited Last 7 Days” to catch forgotten shoots. Set them once, and they update automatically.
Sync with Lightroom Mobile (Optional)
If you use Lightroom Mobile, enable syncing for key collections. I sync my “Client Delivery” and “Social Media” collections so I can edit on the go. Just remember: only Smart Previews sync—originals stay on your computer.
Step 6: Edit Efficiently with a Consistent Workflow
Organization isn’t just about storage—it’s about speeding up editing. A clean library means less time searching and more time creating.
Batch Edit with Sync Settings
Edit one strong photo, then select others and click Synchronize. Lightroom applies the same adjustments—exposure, white balance, tone curve—to all selected images. Perfect for consistent lighting across a shoot.
Use Presets Wisely
I have a few custom presets for my style: “Warm Film,” “Cool Moody,” “High Contrast B&W.” But I never rely on them blindly. Always tweak after applying—presets are starting points, not final edits.
Work in Stages
I edit in three passes:
1. Global Adjustments: Exposure, contrast, white balance
2. Local Adjustments: Graduated filters, radial filters, spot removal
3. Final Polish: Sharpening, noise reduction, export settings
This keeps edits focused and prevents overwhelm.
Step 7: Backup, Archive, and Maintain Your System
A workflow is only as good as its backup. I follow the 3-2-1 rule: 3 copies, 2 different media, 1 offsite.
Daily Backups
Every night, I back up my Lightroom catalog and most recent edits to:
– An external SSD (connected via USB-C)
– Backblaze (cloud backup)
This protects against drive failure, theft, or ransomware.
Archive Old Projects
Once a project is delivered and backed up, I move it to a long-term archive drive. I label it clearly: “ARCHIVE_2023_Weddings.” This keeps my active catalog lean and fast.
Clean Up Regularly
Every quarter, I:
– Delete rejected photos (after confirming backups)
– Update keywords and metadata
– Check for duplicate images
– Review Smart Collection rules
Maintenance prevents digital clutter from building up.
Key Takeaways: My Lightroom Workflow in a Nutshell
- Start with a solid catalog: Store it on a fast drive, name it clearly, enable Smart Previews.
- Import smartly: Use “Copy as DNG,” organize by date/event, add metadata, and backup immediately.
- Cull fast: Flag, rate, and filter to narrow down to your best shots.
- Tag everything: Use hierarchical keywords, people tags, and metadata presets.
- Use Collections: Manual for projects, Smart for automation.
- Edit in stages: Global → Local → Polish, and sync settings for consistency.
- Backup religiously: Follow the 3-2-1 rule and archive old work.
FAQ: Common Lightroom Organization Questions
Q: Should I use one catalog or multiple catalogs?
A: One catalog is usually best for most photographers. It keeps everything searchable in one place. Use multiple catalogs only if you manage very different types of work (e.g., personal vs. commercial) or need to share specific projects with clients.
Q: How do I find duplicate photos in Lightroom?
A: Lightroom doesn’t have a built-in duplicate finder, but you can spot them by sorting by filename or date. For advanced detection, use third-party tools like Duplicate Photo Cleaner or Photo Sweeper, then remove duplicates outside Lightroom to avoid catalog issues.
Q: Can I organize photos without moving files on my hard drive?
A: Yes! Use Collections and Smart Collections. They group photos virtually without changing file locations. This is safer and more flexible than moving files manually.
Organizing photos in Lightroom isn’t about perfection—it’s about consistency. You don’t need a fancy setup. You need a system you’ll actually use. Start small: pick one step from this guide and implement it today. In a month, you’ll wonder how you lived without it.
Remember, the goal isn’t to have the most beautiful library. It’s to spend less time managing photos and more time making them. With this Lightroom workflow, you’re not just organizing—you’re freeing up creative space.